Why is Restaurant Pasta Better than Homemade?
There are over 10,000 pasta videos on youtube, but none of them explain the 6 fundamentals that every great pasta chef uses every time they make pasta.
This is the framework that I wish I had when I first started learning because it explains the big picture of what makes great pasta, great.
Now, is this single page going turn you in to say Luciano Monosillio or any the great chef’s on the Italia Squisita channel? No. You’ll still need years of experience and learning to achieve that level, but that’s not the goal. However,
My goal with this video is to teach you how to think like those great chefs, because that’s when you’ll experience exponential learning and rapidly improve your pasta skills
As someone has made hundreds of videos thinking about and understanding the fundamentals of cooking, I want to rapidly speed up your learning curve and change the way you approach making pasta at home.
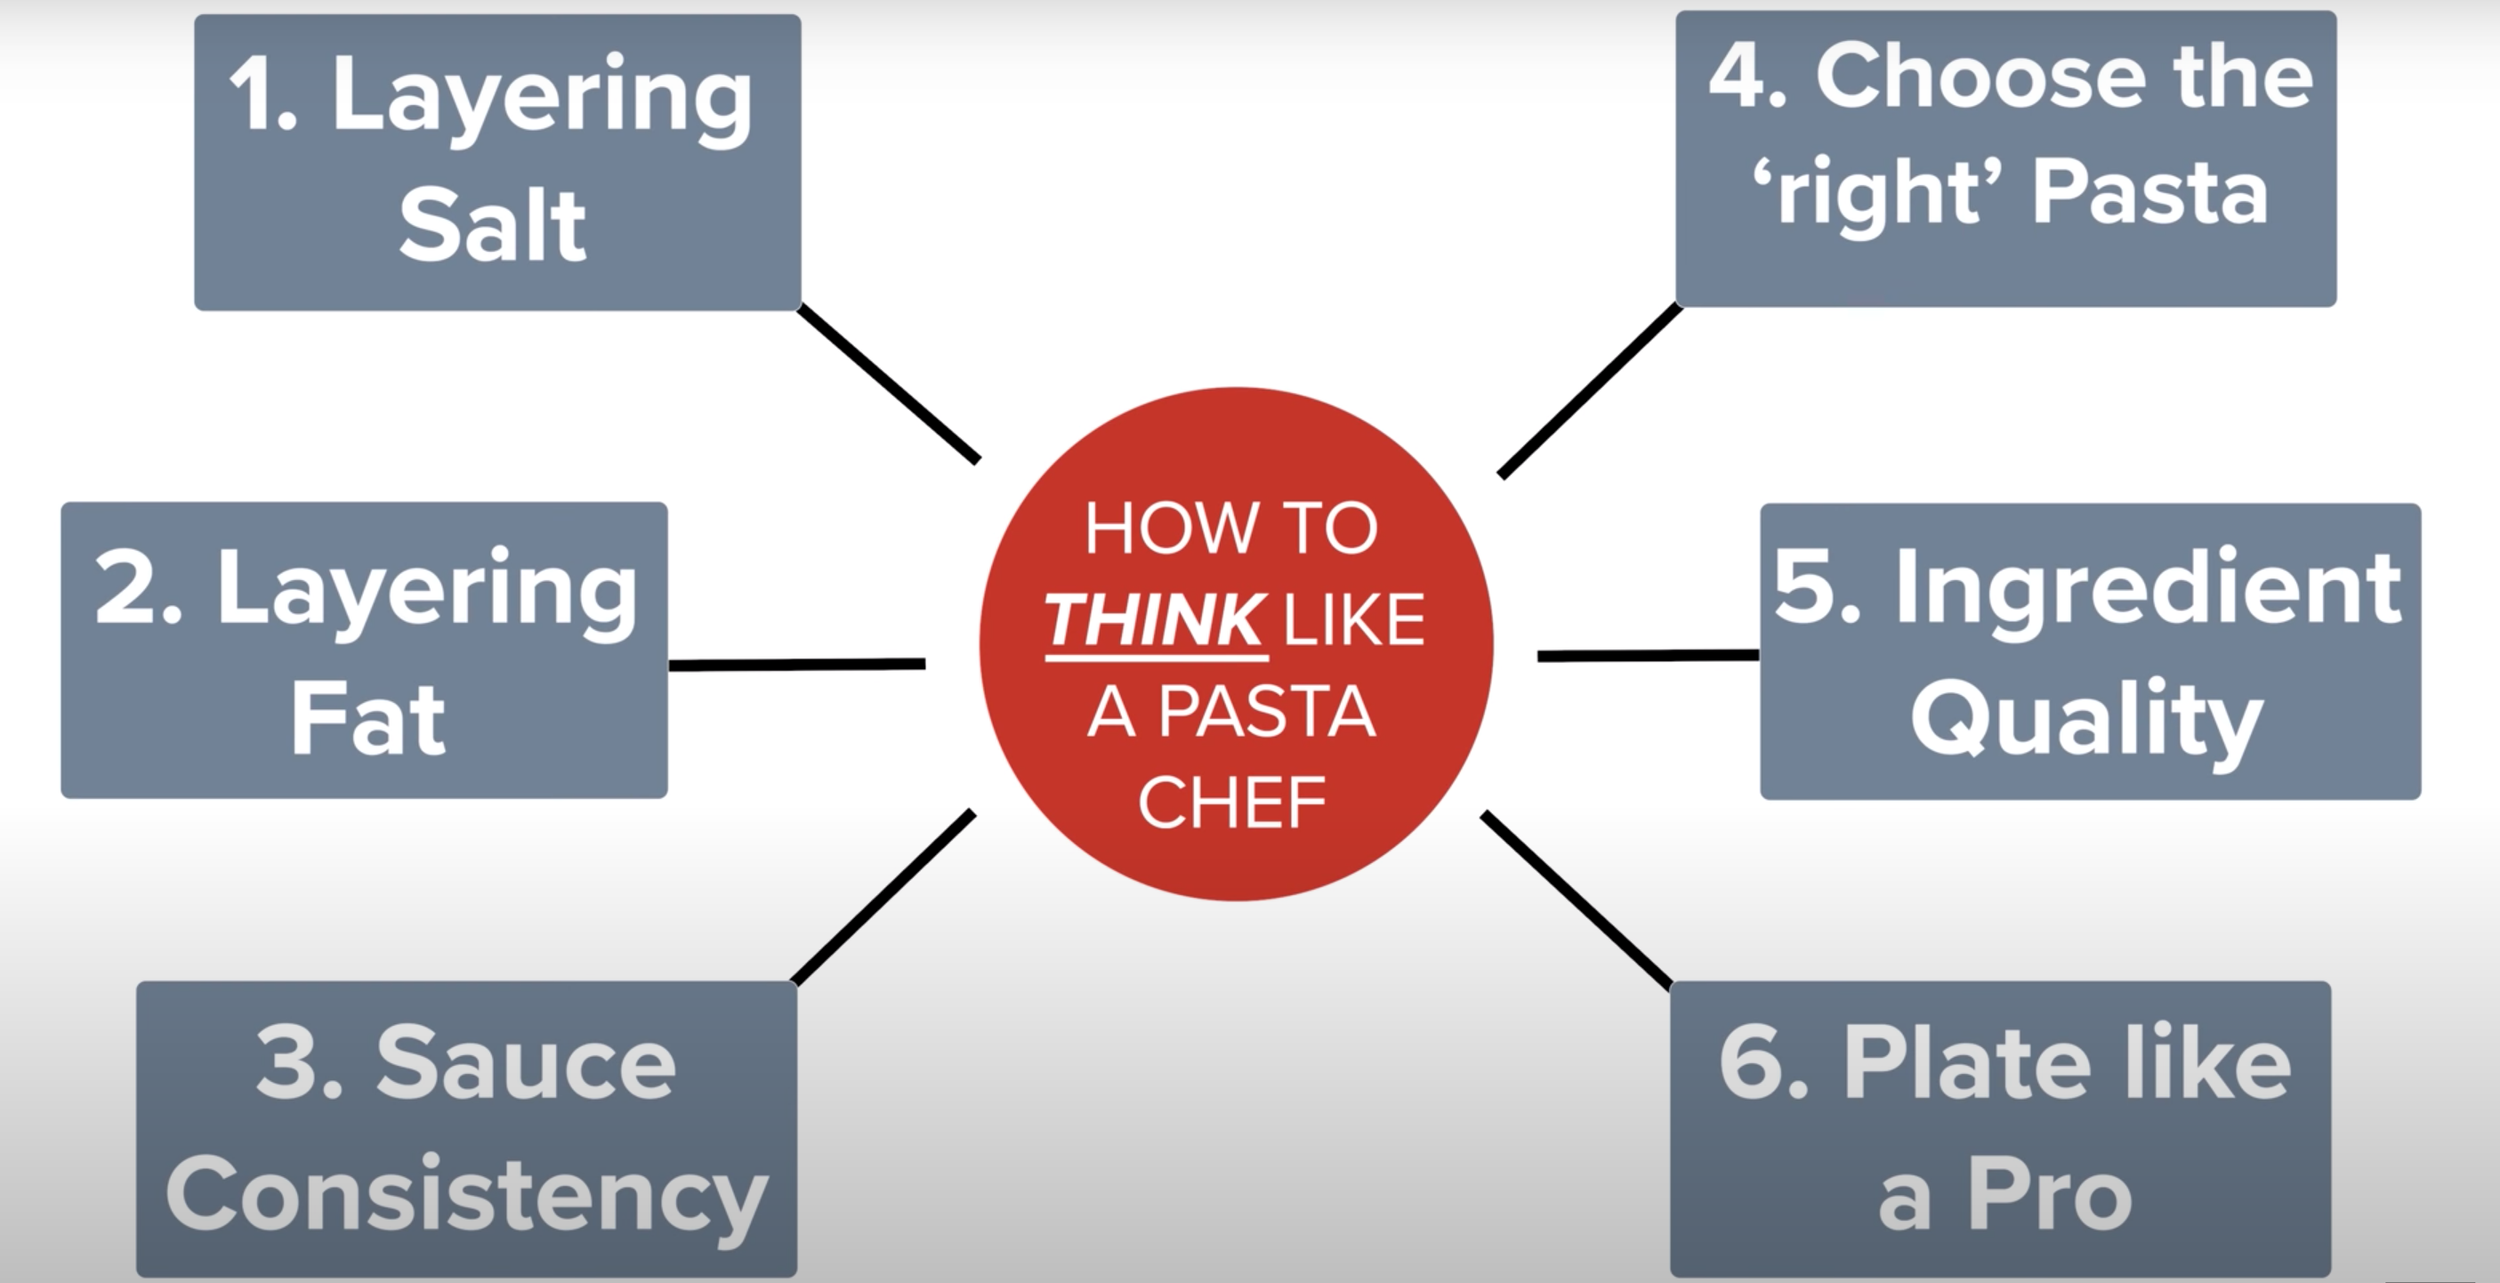
These are the 6 pasta principles (in order of importance) that I would learn if I could start over, and the best part?
Layering Salt
Layering Fat
Control Sauce Consistency
Choosing the Right Pasta
Ingredient Quality Matters
Plate like a Pro (Eat with our eyes)
These can be applied to any pasta dish out there.
We will look at some case studies of classic like carbonara, aglio e olio, and red sauce, but this will also work for home cooking creations such as a lower calorie high protein pasta or a how to use up leftovers.
And to prove that is the case, throughout the video, I’ll show how to apply each principle to this pasta made with jarred sauce and transform it into something entirely new.
Principle 1 - Layering Salt
Salt is probably the number 1 reason why your pasta dishes at home seem to fall flat compared to what you get at your favorite pasta joint, but dumping a salt shaker on our bland pasta isn’t going to magically save it.
What matters is how we add salt and when we layer it.
And for any pasta dish, there are typically 3 areas we need to think about layering in the salt.
Pasta needs to be properly seasoned in 3 areas:
Sauce (which coats the pasta)
Pasta (itself by salting the water)
Garnishes like fresh grated parmesan or rendered guanciale
Now, this may lead you to wonder, how do I learn how much to add?
Well, this is the tricky part, because there’s not one general rule that can be used for every pasta dish, we actually need to analyze the components and adjust accordingly.
For example, this is what Joe Flamm, renowned Chicago pasta chef/Top Chef Winner, said when asked about how much salt to use for the pasta water:
Quote - “It all depends on how salty the oil, sauce, cheese, or filling might be in the finished dish. "If you're making cacio e pepe or carbonara, you've got to go way lighter on that salt.” (in the pasta water)” - Joe Flamm
It’s not only a question of how much salt we add, but also in what form, and when.
Here’s a short table of a bunch of different ways that salt is added to pasta. For example, capers in a puttanesca sauce are going to add a ton of salinity, so we probably aren’t going to add much, if any, granulated salt to the sauce.
Salt can be added in many forms:

Salt comes in many forms
So how do we learn the skill of adding salt appropriately?
Well, again you could do trial and error and you’ll likely still need a little bit of that, but here’s how I like to visualize this.
Imagine every pasta dish is on a bar chart that’s perfectly balanced at a salt level of 100, and that salt level is made up of our three areas, the sauce which is typically the most important, followed by the pasta, and the garnish(es).
At great pasta places, they are going to have the salt levels dialed in every time, but as home cooks, we aren’t likely to every time. So let’s say our acceptable salt range is 80 to 120. Meaning, it’s still pretty good, but maybe slightly underseasoned or overseasoned.
And this is a thought experiment, the 100 isn’t based on any actual data value, but let’s see how a pasta dish's ingredients, or technique, can wildly change how and when we are adding salt.
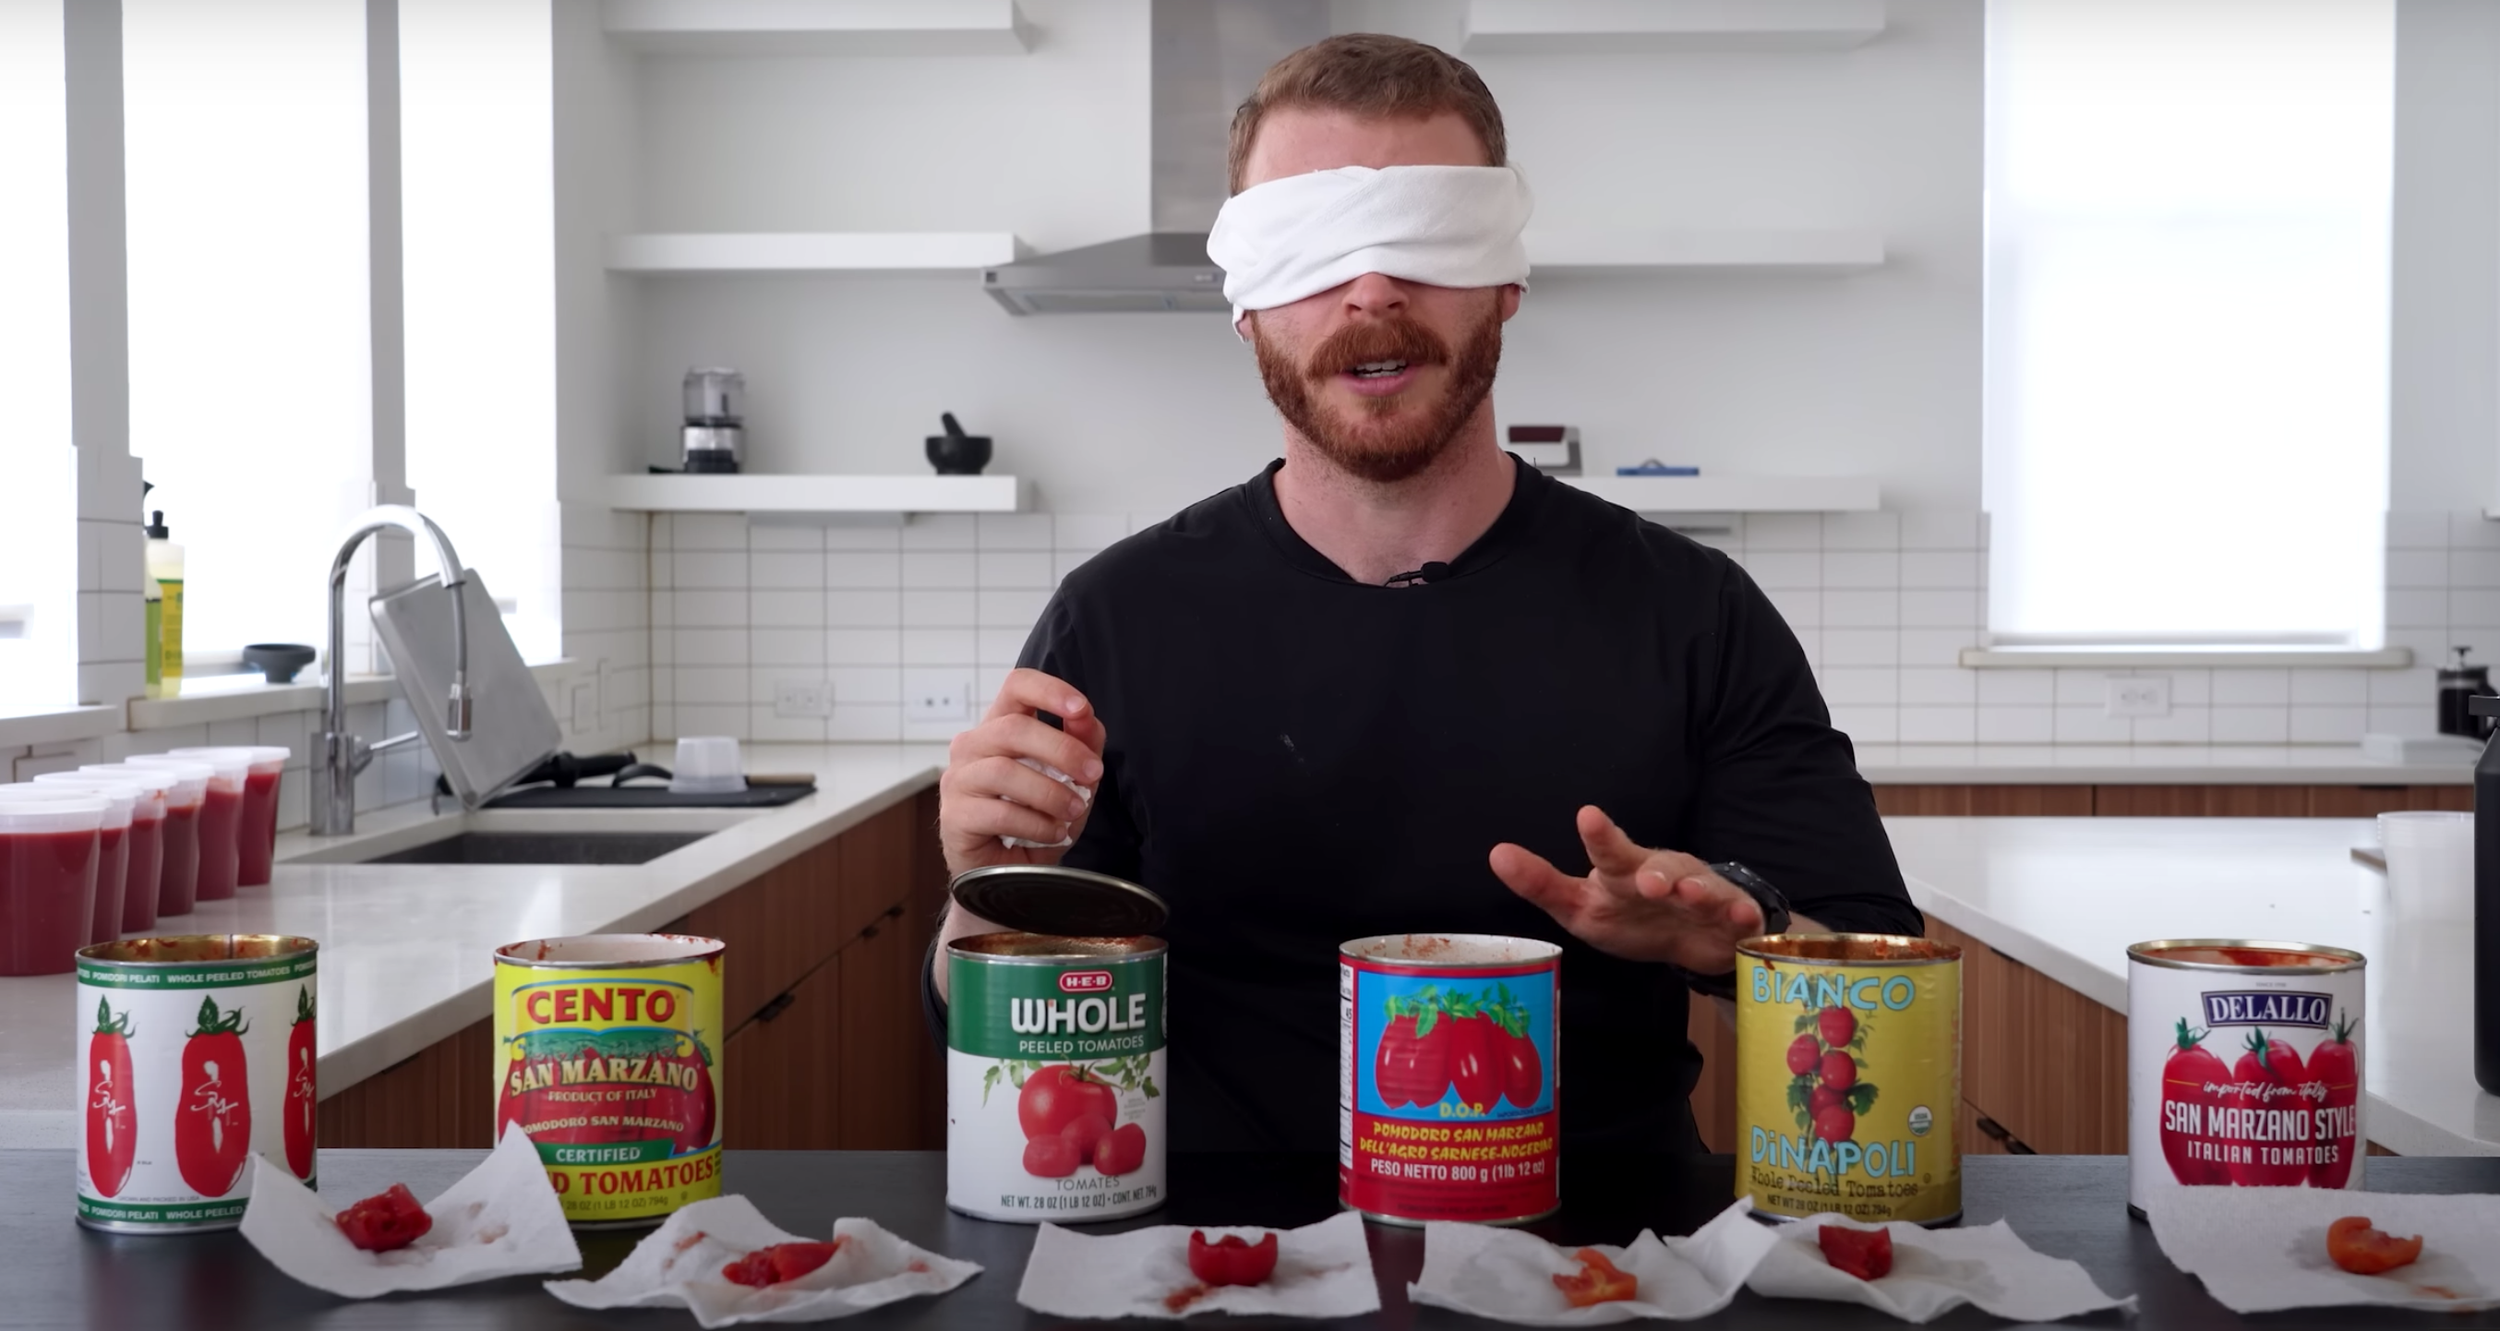
Let’s overlay 3 classic pasta dishes from the Essentials of Classic Italian cooking by Marcella Hazan
Carbonara, aglio e olio, and a 3 ingredient tomato sauce.
Each of these pasta dishes layers salt into the components in different forms, at different times, and in different amounts.
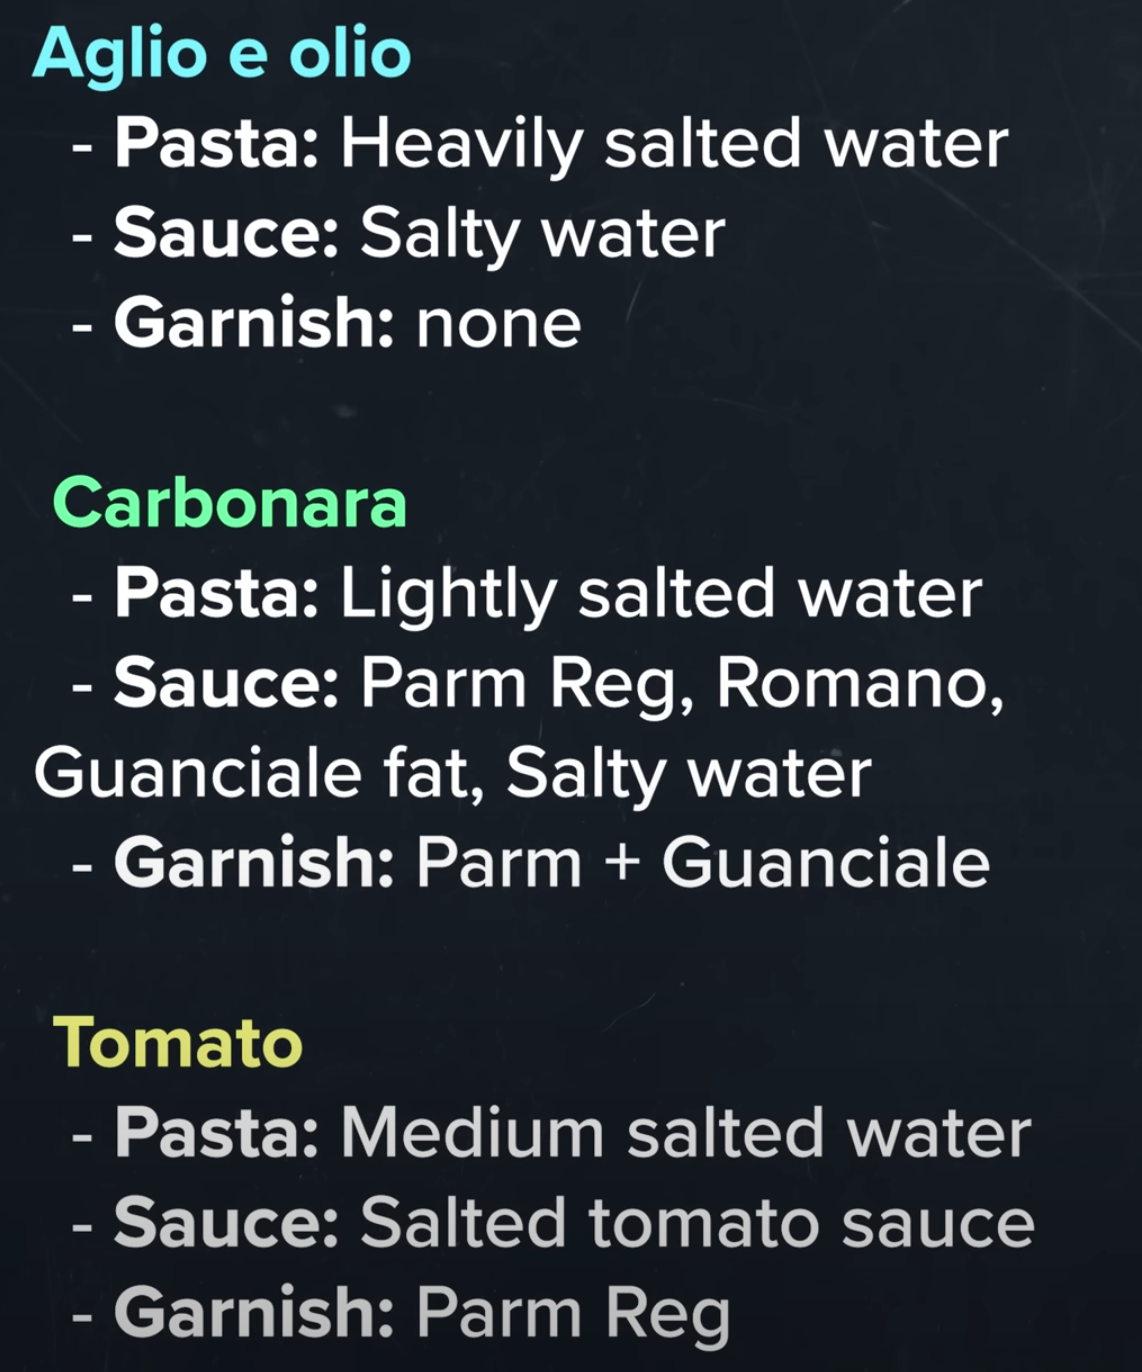
Let’s take a look at the ingredient list for each one and identify where and when salt is added.
What form of salt is added?
For the aglio e olio, all we have is granulated salt which is used in the pasta water.
For the carbonara though, salt is not even listed, instead, the salt is added through the pancetta (also guanciale or bacon), and the Romano and Parmigiano Reggiano cheese.
Lastly, the tomato sauce uses a mix of both with straight-up granulated salt added to the tomatoes and the Parmigiano Reggiano that is used as a garnish when serving.
When is the salt added?
For the aglio e olio, the salt is added to the pasta water, which seasons the pasta itself, but this salty pasta water is also then used to create the sauce.
For the carbonara, much much less salt will be added to the pasta water or even none at all. Instead, the saltiness is added primarily through the sauce via the pancetta or guanciale fat this is rendered down, then the romano and parmigiano cheeses, and lastly, the pancetta is typically reserved as a salty garnish over the top for serving.
Lastly, we have the tomato sauce, where salt is added to the pasta water, salt is added a little bit to the tomato sauce in the beginning and then a bit more to taste once it’s done, lastly, more salt is added through a sprinkling of Parmigiano at serving.
After we zoom out and take a look back at the graph you can see why the values are going to be different.
The aglio e olio is a great dish for showcasing the flavor of the pasta itself, and the pasta water that has been mixed to form the sauce.
On the complete other end of the spectrum, carbonara is about coating that pasta in an enriched Parmigiano & pancetta seasoned sauce with salty pancetta garnish, whereas the tomato sauce is a maybe a more balanced approach with the seasoned tomato sauce, the seasoned pasta, and salty grated parm at the end.
Layering Salt Conclusions
Now I should note that our goal when using salt is never to make the food taste salty, but instead to enhance the existing flavors of that ingredient it touches, and for pasta, we need to be evaluating those three areas:
Sauce (which coats the pasta)
The pasta itself (water)
Garnishes (may be optional)
For our jarred pasta sauce, since it’s already cooked, I’m going to give it a taste. I would say it’s on the saltier side, so when applying this principle: 1) I’m going to thin this out with a little pasta water 2) I’m going to go a little lighter on the salt in the pasta 3) but instead of just leaving it as a plain pasta with sauce, I’ll be using some sausage and parm reg as a garnish.
Now while I would say Layering Salt is probably the most important aspect to learn for home cooks, when actually trying to recreate the restaurant-style dish, it’s all about knowing how to layer the fat.
Principle 2 - Layering Fat
Whether it’s vegetables or pasta, restaurants sneak in fats and oils into way more stages of the cooking process than you do at home.
Now at home, we can control the amount of fat to reduce calories, but first, we need to know how and where to layer fat in our dish to get that addicting, restaurant-level flavor, and then scale back as needed.
Just like salt, there are a ton of forms that fat can potentially be added through pure fats, meats, and cheeses.

The question is what does fat do that makes pasta dishes taste so good?
Taste: Distribute the flavors of an aromatic base, round out the edges in the emulsified sauce, or provide direct flavor through a garnish
Texture: Create a luscious, oily mouthfeel that we find addicting
As Samin Nosrat points out in her book, Salt Fat Acid Heat:
“Fats coat the tongue, allowing various aromatic compounds to stay in contact with our taste buds for longer periods of time, thus, intensifying and prolonging our experience of various flavors.”
Simply put, fat carries and intensifies flavor of whatever we happen to be adding to a dish.
Restaurants know and take advantage of this. If you take a look an Italia Squisita video, every one of those pasta dishes has a nice sheen to it. Much like salt, adding far is not just a question of how much to add, but also in what form, and when.
Here are the three typical areas where fat is usually snuck into pasta.
For pastas, fat is usually snuck into 3 areas
Aromatic Base
Sauce Emulsion
Final Garnish (Flavored Oils)
Let’s take a look at these three areas.
Fat usually first enters a pasta dish when making the sauce through an aromatic base such as adding diced onions, garlic, or carrot and sauteeing them down in olive oil and butter.
This fat becomes infused with the flavors compounds that are fat soluble.
Additionally, spices like red chili flake or oregano could be used. Essentially, we are trapping these flavor compounds in the oil and this aromatic oil base will disperse throughout the entire dish.
Even seemingly healthy red sauces might have a ton of olive oil or butter worked in.
For example, Marcella Hazan’s 3 ingredient tomato sauce has 5 tablespoons or 70 grams of butter per 28 oz can of tomatoes, and I’ll tell you it’s absolutely to die for.
Now while the aromatic base may be the first area to look, next up we have sauce emulsions, which is where the fat is mixed with a liquid that could be pasta water, cheeses, or vegetables.
For example:
A carbonara is created by emulsifying starchy pasta water, rendered guanciale fat, and Parmigiano cheese.
Vodka sauce is created through heavy cream, butter, and tomato sauce
Aglio e olio sauce is created through an emulsion of seasoned pasta water and garlic-infused aromatic olive oil
Many Italian families and restaurants may make a Sunday sauce — a large amount of red sauce — to cook their meatballs, sausages or other meats — so by the end of a long day of stewing, the sauce has become infused with those rendered fats and juices.
Then lastly, when it comes to garnishes, we’ve all seen the little hit of grated parm at the table But a little technique that a lot of restaurants do before it leaves the kitchen is add a little drizzle of aromatic oil like olive or truffle oil. Again, this added fat transports even more flavor.
If you want to work on these skills, check out this tuna pasta video and see if you can find all the forms that fat is added to this dish and when they are added. It’s a straight up masterclass in layering fats. I’ll leave my answers at the end of this page below.
Layering Fat Application Example
Okay so let’s get back to our jarred sauce dish, so when I’m at home, I generally am a little more health conscious so I’m not going to be loading up my pasta in tons of extra oil, butter, meats, and cheese, but once you learn how to layer fats, you’ll start to realize that a little actually does go a long way.
First, I mentioned in the prior section I’m using some Italian sausage that I just tossed on a skillet and let render and get pretty crisp.
Then once the meat is done, I’m going to remove that, but keep the fat in there, and add a little drizzle of olive oil too. Next, I’ll toss in a smashed clove of garlic, and a sprig of rosemary and gently toast them to infuse those flavors into the oil.
Once infused, I poured that off into a bowl. For the plating, I added the crisp sausage then also a little 3-gram drizzle of oil, it’s honestly shocking how good just adding a couple of drops of flavored oil can do for a pasta dish.
Layering Fat Conclusions
Lastly, while generally adding fat will enhance a dish, you can go too far — so be careful. The last thing you want is greasy pasta.
Restaurants hide their fat by properly emulsifying it into the sauce for a smooth and luscious mouthfeel, instead of that broken and oily experience we’ve all had making butter noodles…
Texture/mouthfeel matters a ton for our eating experience, which brings us to fundamental #3, which is probably the hardest to execute: Nailing Sauce Consistency
Principle 3 - Controlling Sauce Consistency
From a watery tomato sauce to a stringy cacio e pepe, or an aglio e olio ends up tasting like watered garlic noodles, sauce consistency is something that great chefs have dialed every single time, but its an absolute bane to most home cooks when first starting out.
What makes it so tough is that each pasta dish is a little bit different in how the sauce is created with the ingredients, and some can be much more finicky than others.
Defining the Emulsion
Pasta sauces generally fall into three categories, which is helpful for understanding how to approach sauce textures:
Pasta Water-Based (Fat + Water): Examples include aglio e olio, alla gricia, alla vongole
Stabilizers: starchy pasta water, cornstarch, butter
Suspension-Based (Pureed Vegetable + Water + Fat): Examples include marinara, bolognese, Sunday sauce, puttanesca, pesto
Stabilizers: tomato paste, starchy pasta water, butter, gelatin from braised meats
Dairy / Egg Based (Existing Emulsion + Water + Fat): Examples include alfredo, cacio e pepe, carbonara, mac & cheese
Stabilizers: cornstarch, cheeses, cream, milk
Why is it helpful to categorize sauces?
Each sauce requires a combination of different ingredients to create a proper emulsion, or getting two liquids to stay together that generally do not want to stay together.
For example:
In an aglio e olio, it’s going to be olive oil and water
In a marinara, it’s going to be the tomatoes, tomato juices, and the oil used in the aromatic base
Then for a traditional alfredo, it’s going to be parmesan, butter, and the pasta water
Nailing the Emulsion
So how do restaurants nail so many different types of sauces?
Restaurants make sauce emulsions foolproof with the following three elements:
Ratio of Liquids to Fats
Heat Control
Emulsion Stabilizers & Thickeners (starch, rouxs, butter, cream, eggs)
Now while these are the three elements that will be used, these are high level because for every pasta dish there is a ton of nuance in how these are used with each other and to what degree depending on how you want to go about
For example, I did an entire video talking about the intricacies of how controlling the heat in cacio e pepe is so important and the multiple ways you can go about it.
I will say, embrace the use of emulsion stabilizers & thickeners of which there are countless ways to dial in the consistency.
Try adding some cornstarch to your grated cheese or make a cornstarch gel. Even Luciano Monosillio does for his restaurant service. There is no right or wrong way to achieve a perfectly emulsified sauce to put on your dinner table.

Sauce Consistency Application
For example, say your aglio e olio ends up as pasta in garlic water instead of a smooth sauce. There are multiple ways to solve this.
Add more fat to distribute among the water, basically, you are making a vinaigrette so the more fat the thicker it will get.
On the other hand, say you are trying to only use a certain amount of oil, then you could
Increase the heat in your pan which will boil off and reduce the amount of water giving you a higher ratio of fat as well.
By reducing the water you are also increasing the concentration of the pasta starch which will help thicken the water,
or you could make a separate cornstarch slurry to add, or maybe a knob of butter will make it perfect too.
For our jarred sauce, since this is already blended, I highly recommend saucing your pasta in the pan with some of the starchy pasta cooking water. Simmer and toss until it beautifully coats each noodle.
Principle 4 - Choosing the Right Pasta
When I was in college, the right pasta always meant the cheapest pasta, but as soon as you have room in the budget I highly, highly recommend spending the extra dollar or two on a bronze-cut pasta.
It’s probably the lowest-hanging fruit to instantly start making better pasta even when just using it with a jarred tomato sauce and it has 3 primary advantages.
In general, there are two categories of dried pasta at the store:
Those cut from Teflon dies and 2. those cut from bronze cut dies.

The two have completely different textures and qualities when cooking.
The Teflon die-cut pasta is processed faster and thus has a smoother texture, whereas pasta cut from bronze dies is extruded and dried slower leaving it with a rougher texture with more starch.
Here are the 3 main potential advantages of bronze die cut pasta:
More starch is released which helps bind the sauce like we just talked about
Sauce sticks better to the slightly rough texture, which is great for a tomato sauce that may otherwise slide off
More intense ‘pasta’ flavor, which could be advantageous for a pasta forward dish like aglio e olio
At the store, the cheapest box is typically the Teflon cut at around $1 per box, then the average bronze cut box is typically around $3, but you can find artisanal batches all the way up to $7 or more
Now for most home cooks, I would say the upgrade to the entry-level bronze cut is well worth it, but it’s probably diminishing returns on the more expensive artisanal version.
This may lead you to wonder: which brand is the best?
I also personally love trying out various bronze-cut pastas, but DeCecco is always a good option that most grocery stores have.
Also if you want to learn a little more about this topic, I have an additional video on it and my friend Alex has done a deep dive into pasta shapes as well as ranking some specific brands you can try out too.
Lastly, why am I not talking about fresh pasta?
Well remember my goal is to quickly speed up your thinking and baseline knowledge, fresh pasta probably deserves its own video and for me is in that last 20 to 30 percent
However, if you want to start learning I would highly recommend Marc Vetri’s book “Mastering Pasta”.
Principle 5 - Ingredient Quality Matters
This one’s simple — the better ingredients you can find or get access to, the better your dish will likely taste. When it comes to pasta these are typically the areas you want to pay attention to
This usually comes down to:
Sauce Components (Tomatoes, Cheese, Cream)
Added Meats & Vegetables
Herbs and Aromatics
Garnishes
So what I would do is take a look at the ingredients for each of these areas and figure out if there are big differences in quality depending on the dish
Additionally, I’ve done videos about the quality of the olive oils and another huge upgrade is to find real Parmigiano Reggiano or Pecorino Romano - it’s the gold standard at restaurants that will help you recreate that experience at home
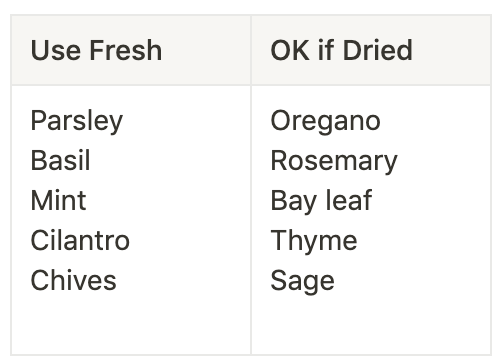
Lastly what about using dried vs fresh herbs?
Here’s a little table that goes over some of the common ones to use fresh vs some that work well dried too.
All of this stuff will affect the dish to some degree and that’s part of the practical experience that you will need to gain as you progress in your pasta journey.
While these ingredients will help a ton with flavor, you still need to properly plate each pasta dish for maximum enjoyment, which is my 6th and final tip.
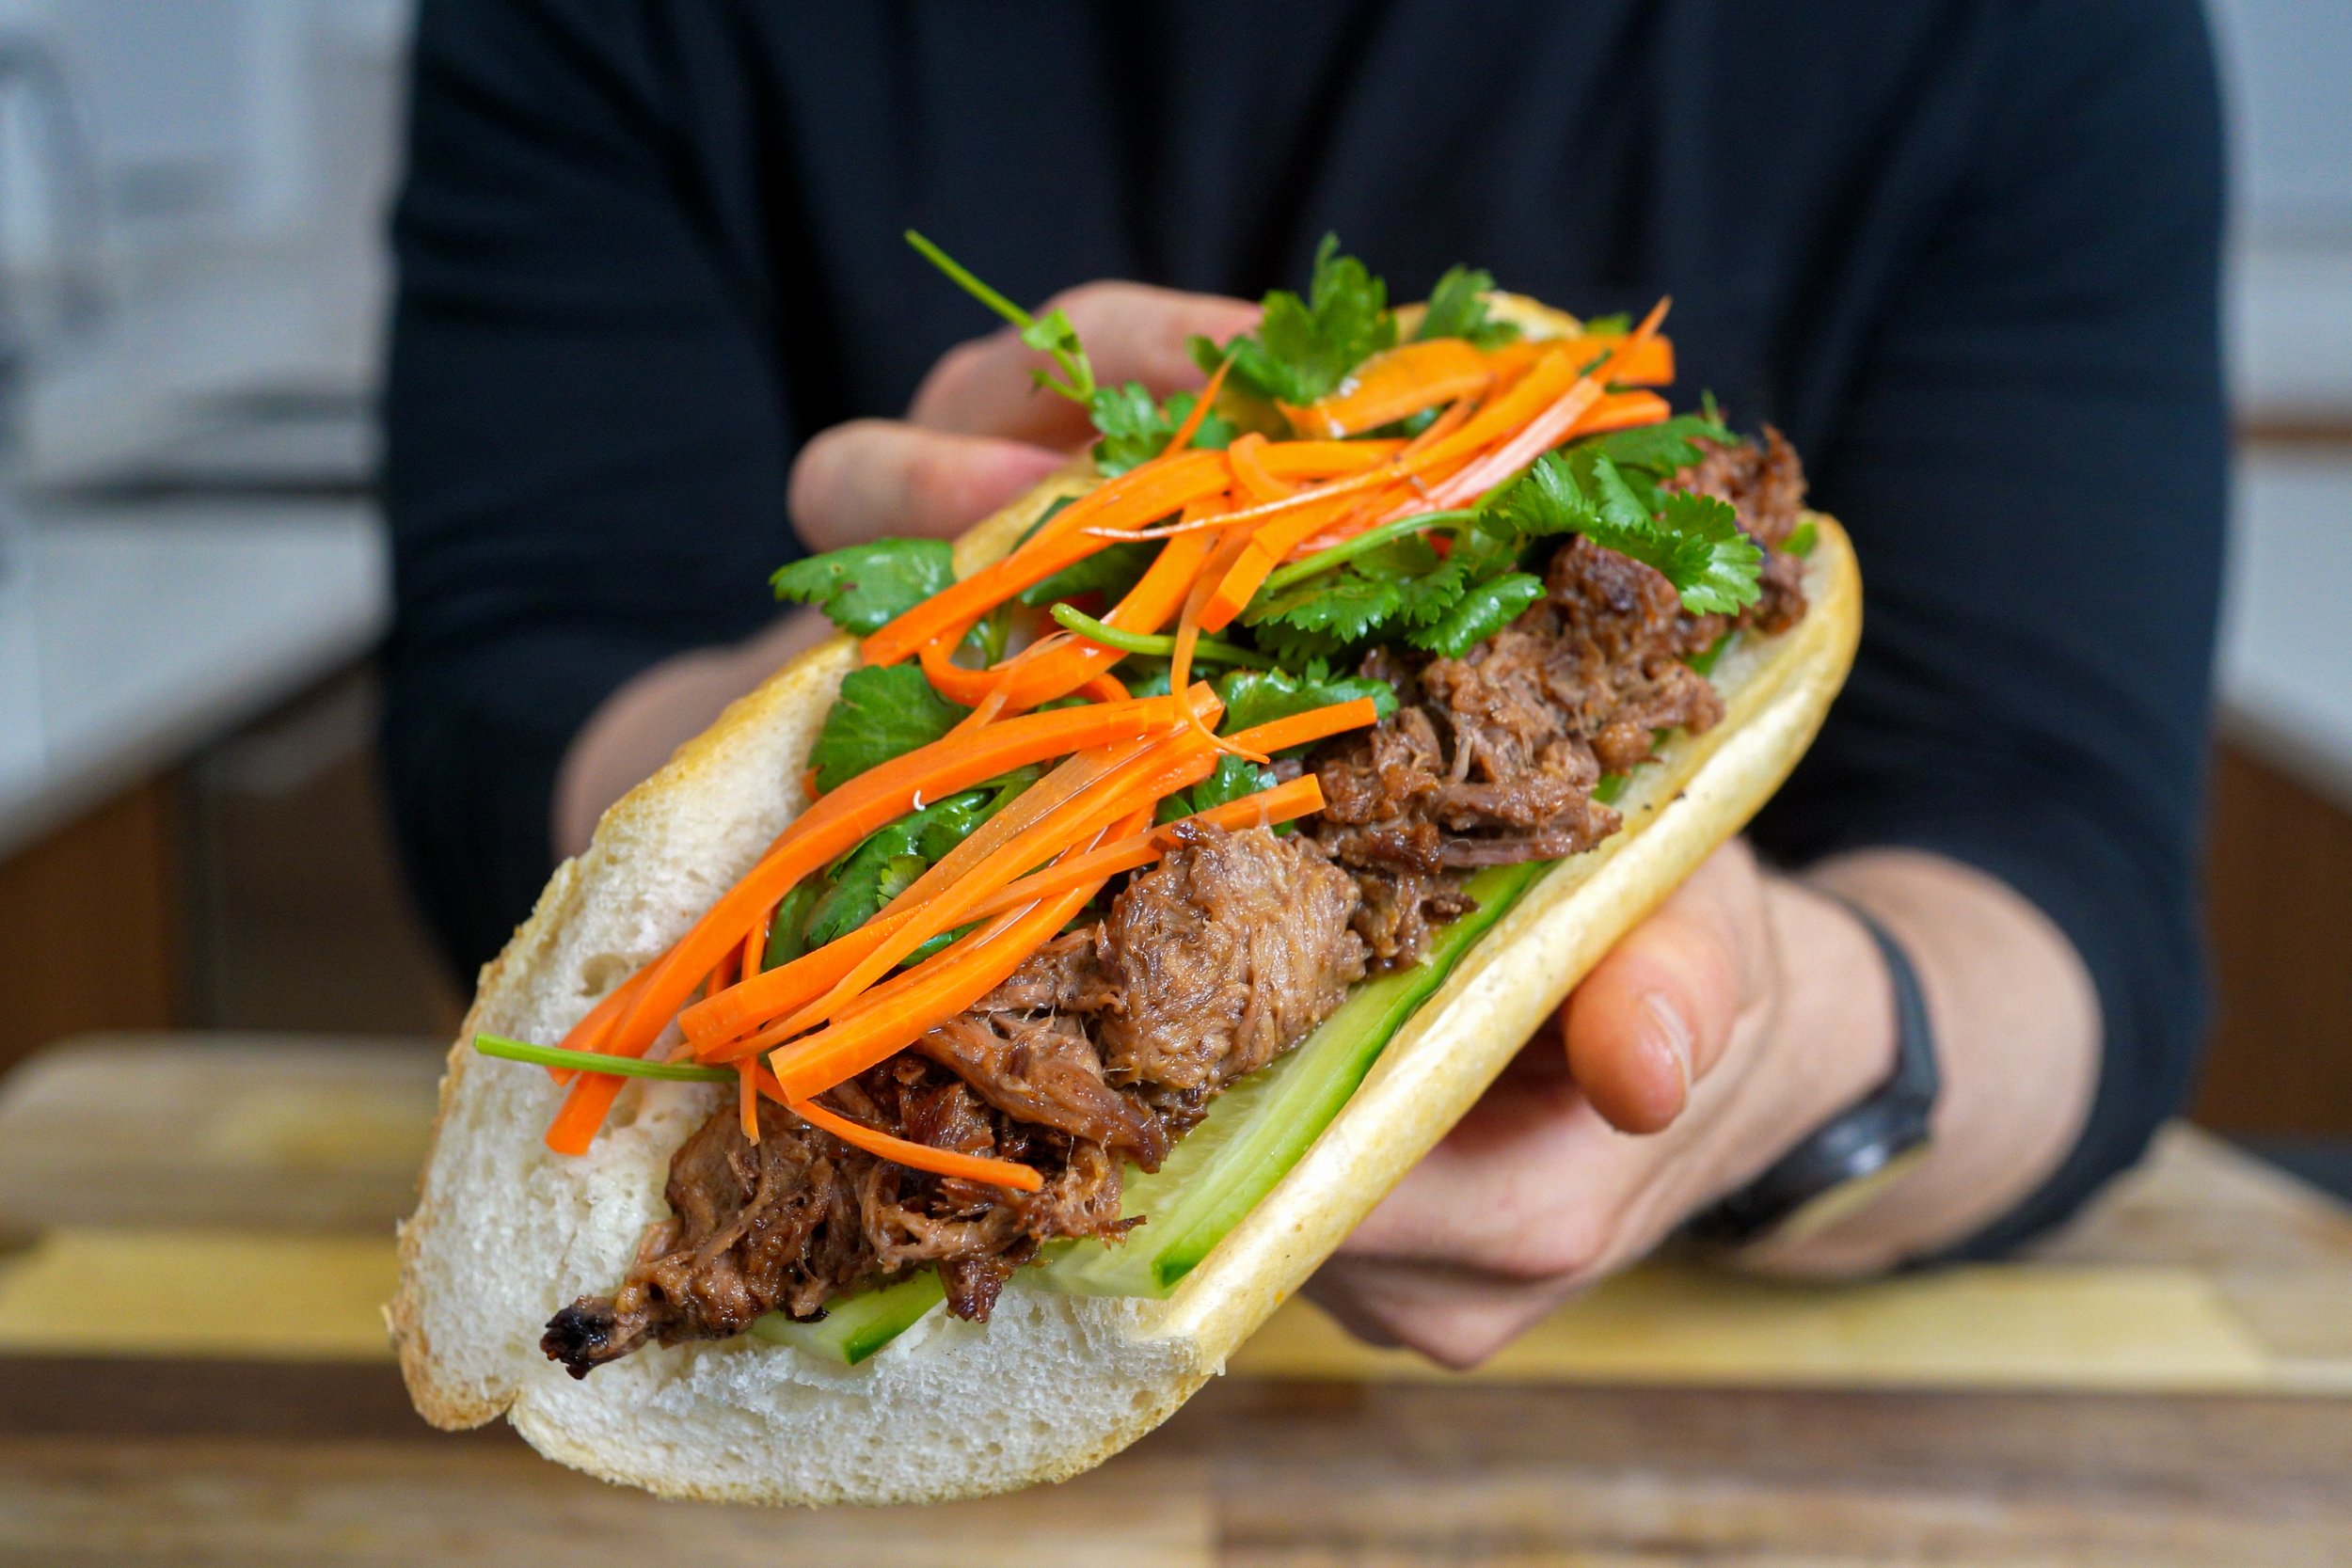
Principle 6 - Plate like a Pro
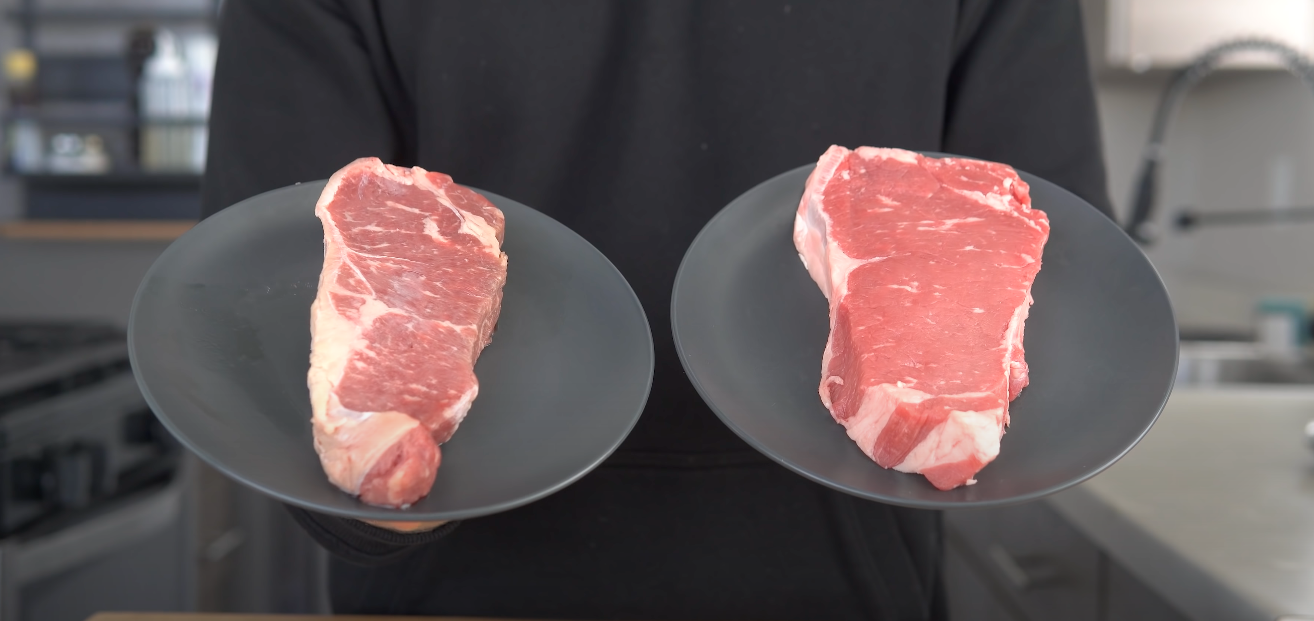
Take a look at these dishes of pasta, there is no doubt one of them looks more enticing than the other.
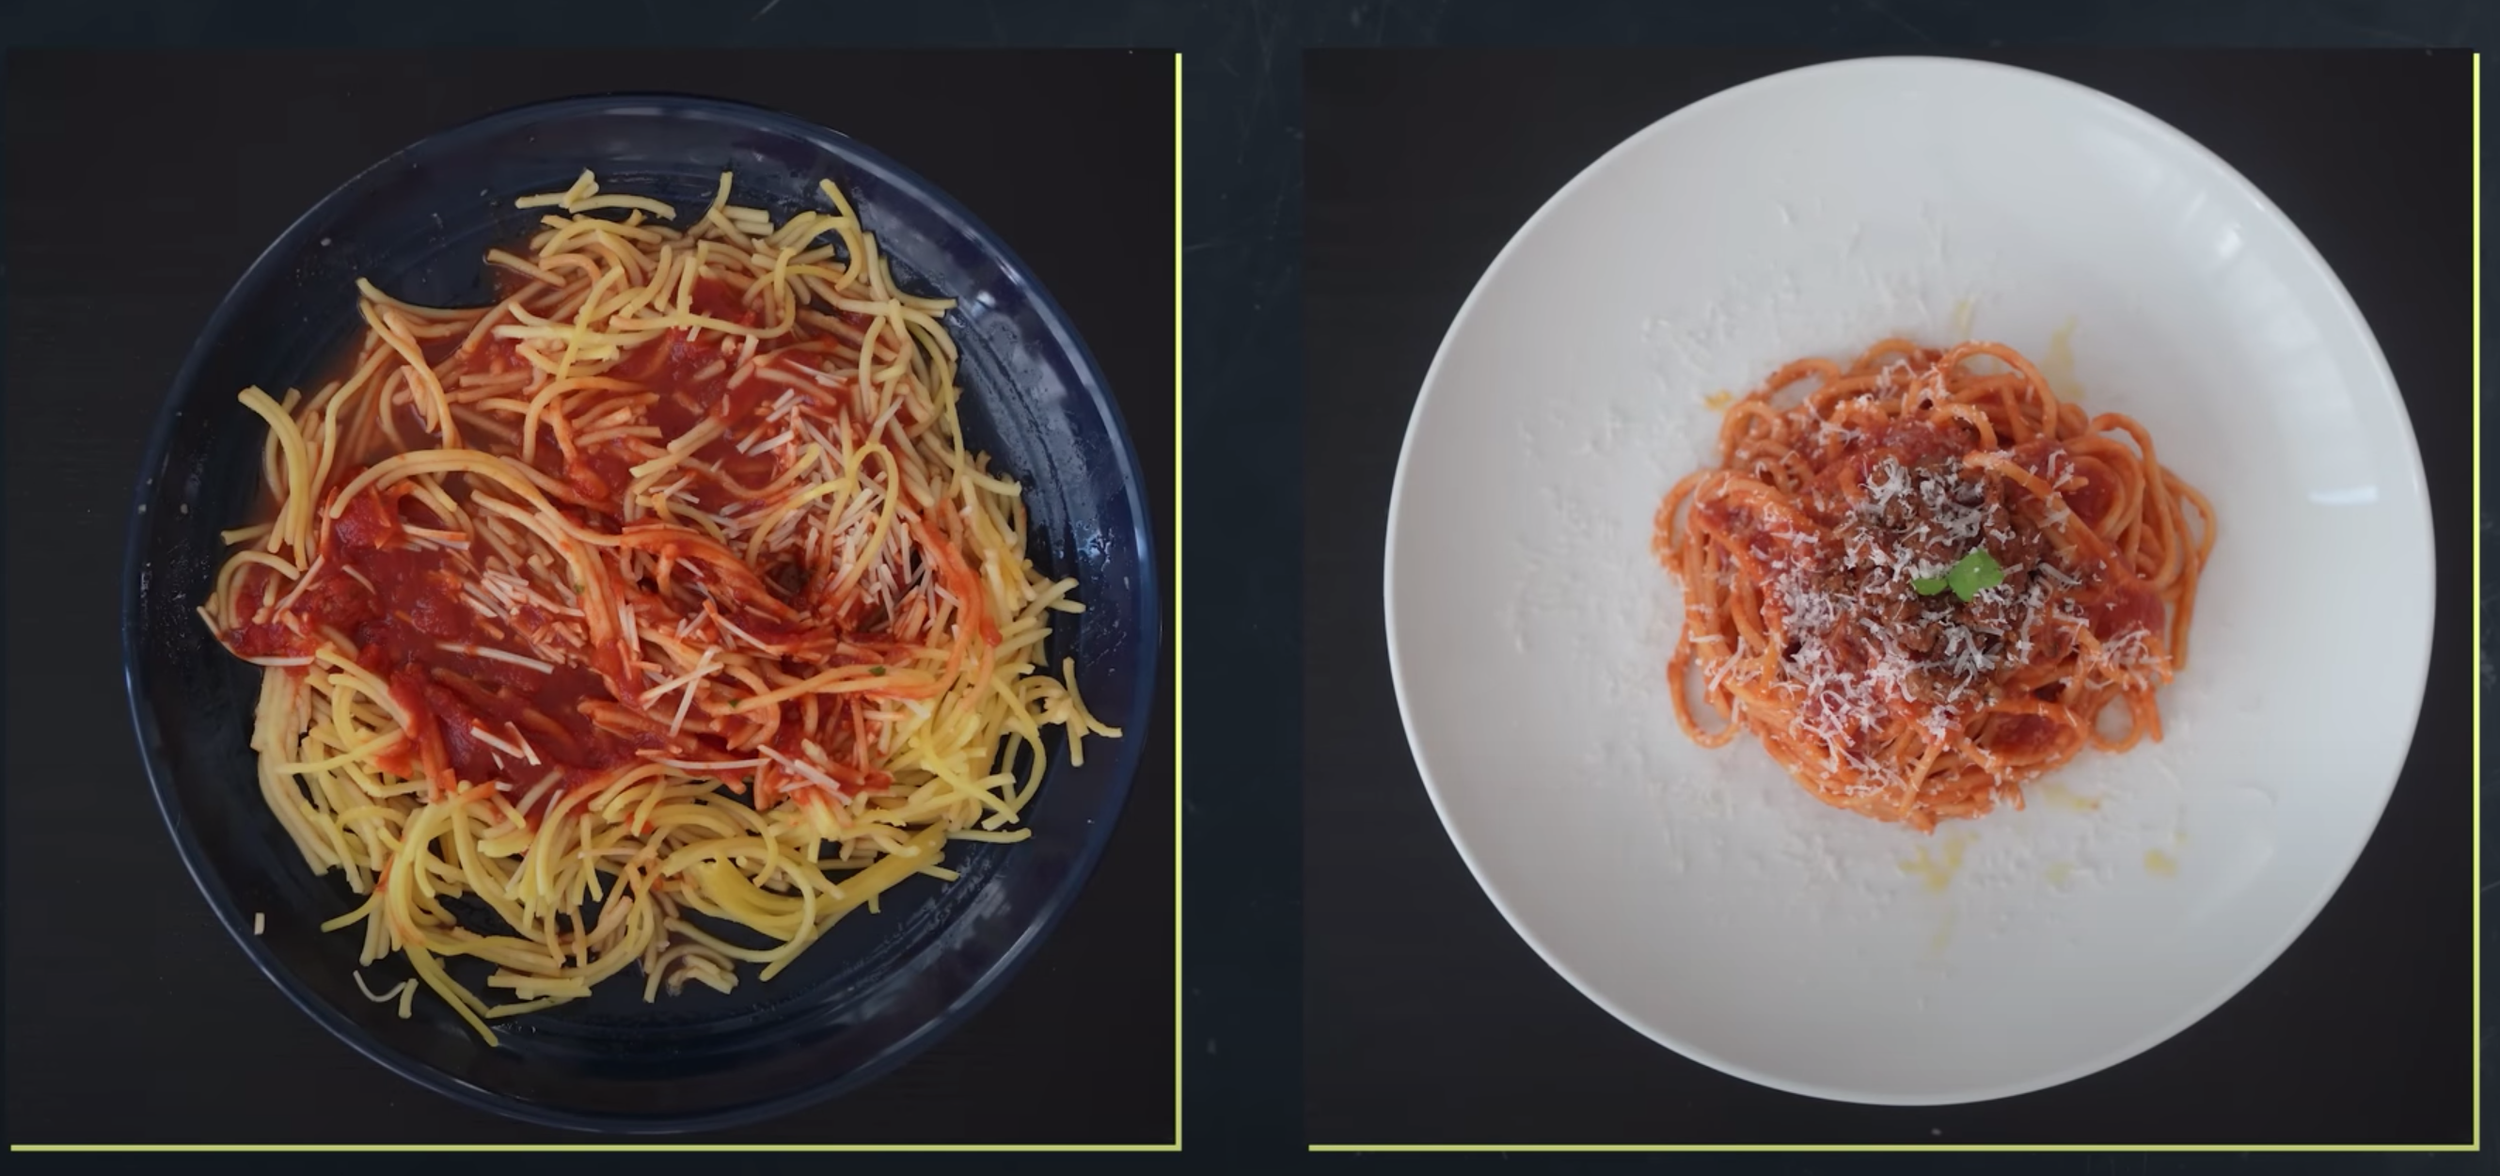
However, it’s important to note that plating isn’t just about fooling yourself into thinking something tastes good because it looks good, if you haven’t done the prior 5 fundamentals, it doesn’t matter how it looks. That being said, here are the 4 key areas to evaluate when it comes to plating.
Restaurant quality pastas
Use the appropriate plate or bowl
Sauce and shape the pasta
Add extra sauce or fat over top
Garnish for contrast & freshness
These are best learned through observation, but let me point an example or two for each.
When it comes to the serving vessel, using a large shallow plate or bowl to plate pasta it creates that negative space making the food act as a centerpiece when compared to being dumped into a cereal bowl.
When it comes to saucing and shaping, it depends on the pasta dish, but a classic move is to add height to spaghetti for example, by using the twirl trick rather than laying it out flat.

Thirdly, if you do end up watching any of the Italia Squisita channel, you’ll see they almost always reserve some sauce for plating or an aromatic oil to give it that pop of flavor and for our eyes the visual sheen.
Lastly, garnishes are a critical step. Even a light snowing of parm with a basil leave is a way to entice our eyes and adding a little guanciale or crisped sausage as a topping ensures they aren’t all lost to the bottom of the plate.
Final Thoughts
My goal was not to give hyper-specific technique or ingredient recommendations, but really to demonstrate these guidelines as a mental model that will help you think like a great pasta chef and explode your skills faster than you originally thought.
Check out my full video on this topic here.
Answer Key!
Every moment fat was added in the Tuna Pasta video:
Olive oil & basil are added to the tuna chunks to soak & infuse
Some of this oil is added to the pan to infuse with garlic and cook the tomato sauce
Chili oil is added to the cooking tomato sauce
More olive oil from the tuna bowl is added to adjust the sauce consistency
After plating, aromatic basil olive oil is drizzled over the pasta
Sources
Italia Squisita videos:
Tuna Pasta: https://www.youtube.com/watch?v=0wDO3OmT9Dc
My videos mentioned:
Is expensive pasta worth it?: https://youtu.be/UyZVHR-FodY
Why cacio e pepe is so hard to execute: https://www.youtube.com/watch?v=10lXPzbRoU0
Are you buying the right olive oil?: https://www.youtube.com/watch?v=9GNrwBYjoFg
Alex video on dried pastas: https://youtu.be/v_XMTvAgpEw
Anthony Bourdain Oprah Interview: https://www.youtube.com/watch?v=EGbRwUojtcw
Books mentioned:
Essentials of Classic Italian cooking by Marcella Hazan
Salt Fat Acid Heat by Samin Nosrat
Mastering Pasta by Marc Vetri & David Joachim
Recipes from my website:
Cacio e pepe: https://www.ethanchlebowski.com/cooking-techniques-recipes/cacio-e-pepe-the-easy-way
Carbonara